Good Sunday morning! Hope you all had a happy Thanksgiving! Dropping in to share my grandson's first Thanksgiving picture-
He's just the cutest!
A few weeks ago I was the lucky winner of a beautiful fall pocket mini album by leaving a comment on Ginger Ropp's blog - My Sisters Scrapper. She had participated in "Thankful for Fall Blog Hop" on November 19th.
Thank you Ginger! You are such an inspiration to me - I will treasure this always!
I finally pulled out all my Christmas papers and embellishments. Now I just need to sketch out the design for this year's card and get to work!
Thanks for stopping by! Enjoy your week ahead~
N.
Sunday, November 27, 2016
Sunday, November 20, 2016
Candy Cane Lane
Hi folks,
Popping in this afternoon to share a window box I made at a Stampin Up workshop that I attended last week. Along with red cardstock to make the box and the dividers inside the box, we used one of their new Christmas design series papers Candy Cane Lane.
We used Stampin Up's acetate window sheets and washi tape for the lid.
For the cookie sheet, we cut out a rectangle from silver paper, scored at both ends and rounded the corners. We used a coordinating punch and stamp set for the 'cookies'.
We fussy cut the gingerbread houses out of the pattern paper along with the peppermint candy and the gingerbread man.
Love the embossing folder we used on this card along with the pattern paper and punched out gingerbread men!
Another tag made to attach to the ribbon which was tied around the box to hold it closed.
Popping in this afternoon to share a window box I made at a Stampin Up workshop that I attended last week. Along with red cardstock to make the box and the dividers inside the box, we used one of their new Christmas design series papers Candy Cane Lane.
We made 4 each of 2 different size tags that fit inside the different compartments inside the box
We also made A2 cards to fit into one of the compartments
We fussy cut the gingerbread houses out of the pattern paper along with the peppermint candy and the gingerbread man.
Another tag made to attach to the ribbon which was tied around the box to hold it closed.
I really enjoyed this workshop and plan to make more of these using some older Christmas papers and embellishments to match. They make a great gift too.
That's it from me. Enjoy your week ahead. And Happy Thanksgiving!
N~
Sunday, November 13, 2016
Good Ol Sport
Hey there! Happy Sunday to you all.
I finished the cover to my Christmas Carol tri-fold folio album. Here are a couple of photo's:
So appropriate since it's football season!
That's it from me this week. Enjoy your week ahead!
N~
I finished the cover to my Christmas Carol tri-fold folio album. Here are a couple of photo's:
I wrapped a piece of ribbon from my stash around the green pattern paper and tied a bow to the right side and adhered it to the front cover. I mounted a chip board piece that came with the paper line to 2 gold doilies from Stampin Up. I fussy cut some stamps from one of the papers along with the title "A Christmas Carol" and added them to the upper left corner and lower right corner.
It's another co-worker's birthday this week at work , so I was put to the challenge of making a masculine card. I always turn to Graphic 45's "Good 'Ol Sport" paper line.
So appropriate since it's football season!
That's it from me this week. Enjoy your week ahead!
N~
Sunday, November 6, 2016
Christmas Carol Trifold Folio album
Good Sunday morning to everyone.
I'm a huge fan of Ginger Ropp's blog: MySistersScrapper.com and her tutorials are fabulous! She posted the tutorial on how she constructed a trifold folio album. I put one together using last years Graphic 45's Christmas line - A Christmas Carol. The album measures 6" x 9".
This is the inside front cover and first page. I made lots of photo booklets to be tucked inside all the pockets.
Flipping the second page over and you get this! The center has another waterfall folio and will hold up to 17 pictures. More pockets that will hold journaling cards and photo booklets.
This is the 3rd section - another pocket page with journaling cards and photo booklets. And a 3 pocket-page that holds 3 different sized photo mats. And below are pictures of some different sizes of the photo booklets I made:
I didn't show the front or back covers as I'm still deciding on which papers and embellishments I want to use!!
Thanks for stopping by and enjoy your week ahead!
I'm a huge fan of Ginger Ropp's blog: MySistersScrapper.com and her tutorials are fabulous! She posted the tutorial on how she constructed a trifold folio album. I put one together using last years Graphic 45's Christmas line - A Christmas Carol. The album measures 6" x 9".
This is the inside front cover and first page. I made lots of photo booklets to be tucked inside all the pockets.
Flipping the second page over and you get this! The center has another waterfall folio and will hold up to 17 pictures. More pockets that will hold journaling cards and photo booklets.
I cut out the actual Christmas Carol story and adhered them to the 2 inside pocket pages.
This is the 3rd section - another pocket page with journaling cards and photo booklets. And a 3 pocket-page that holds 3 different sized photo mats. And below are pictures of some different sizes of the photo booklets I made:
I didn't show the front or back covers as I'm still deciding on which papers and embellishments I want to use!!
Thanks for stopping by and enjoy your week ahead!
Sunday, October 30, 2016
pre halloween
Hi everyone!
Jumping in today to share a 'pre-Halloween' picture of Bradley in his Halloween costume.
Someone is bored with this whole Halloween thing!
That's all from me. Have a great week ahead and Happy Halloween!
N~
Jumping in today to share a 'pre-Halloween' picture of Bradley in his Halloween costume.
Someone is bored with this whole Halloween thing!
I was sorting through some newer stamp sets and came across one I haven't used before. It's by Stampin Up called Wherever You Go. The sentiment stamp was put on my acrylic block crooked so it stamped crooked. This card will go in my scrap box to be fixed at a later date!
This card was made using an old paper line from Graphic 45 called French Country. I so love this paper and it's perfect for a fall birthday card.
N~
Sunday, October 23, 2016
Boos & Brews
What a beautiful Sunday it is here in Chicago land! Not only are we having unseasonably warm weather for late October - getting up to 70 degrees today! But our home team became the National League champions after last night's game against the LA Dodgers! We have not been this close to winning the pennant since 1945! Go Cubbies! I am flying the 'W' -
So on to crafty things to share! I finished my grandson's 1st Halloween mini pocket photo album.
This is the inside front where I created a pocket and added some tags from the collection. You can use the back of the tags for journaling or photos.
I added a waterfall folio which will hold 7 pictures.
I downloaded a picture of this character from Monsters, Inc. which replicates the baby's costume.
The stars and wiggly eyes are from Doodlebug Boos and Brews.
My daughter in law goes all out! Both the baby and the dog (Roxy is a teacup terrier) will be dressed up this Halloween. Bradley will be a character from Monsters, Inc. which is pictured on the front of the card and Roxy is a Minion! Pictures to follow after Halloween!
I will close today by sharing Bradley's 2 month old picture.
Thank you for visiting and have a great week ahead!
N~
So on to crafty things to share! I finished my grandson's 1st Halloween mini pocket photo album.
The album measures 6x6; the spine measures 2 3/4 x 6. I used Doodlebug's Boos and Brew paper line with all the embellishments that came with this line. I had some of Doodlebug's Halloween paper line from 2015 left over and I used it on some of the pages. The front cover design is a download I got off of Pinterest.
I added a waterfall folio which will hold 7 pictures.
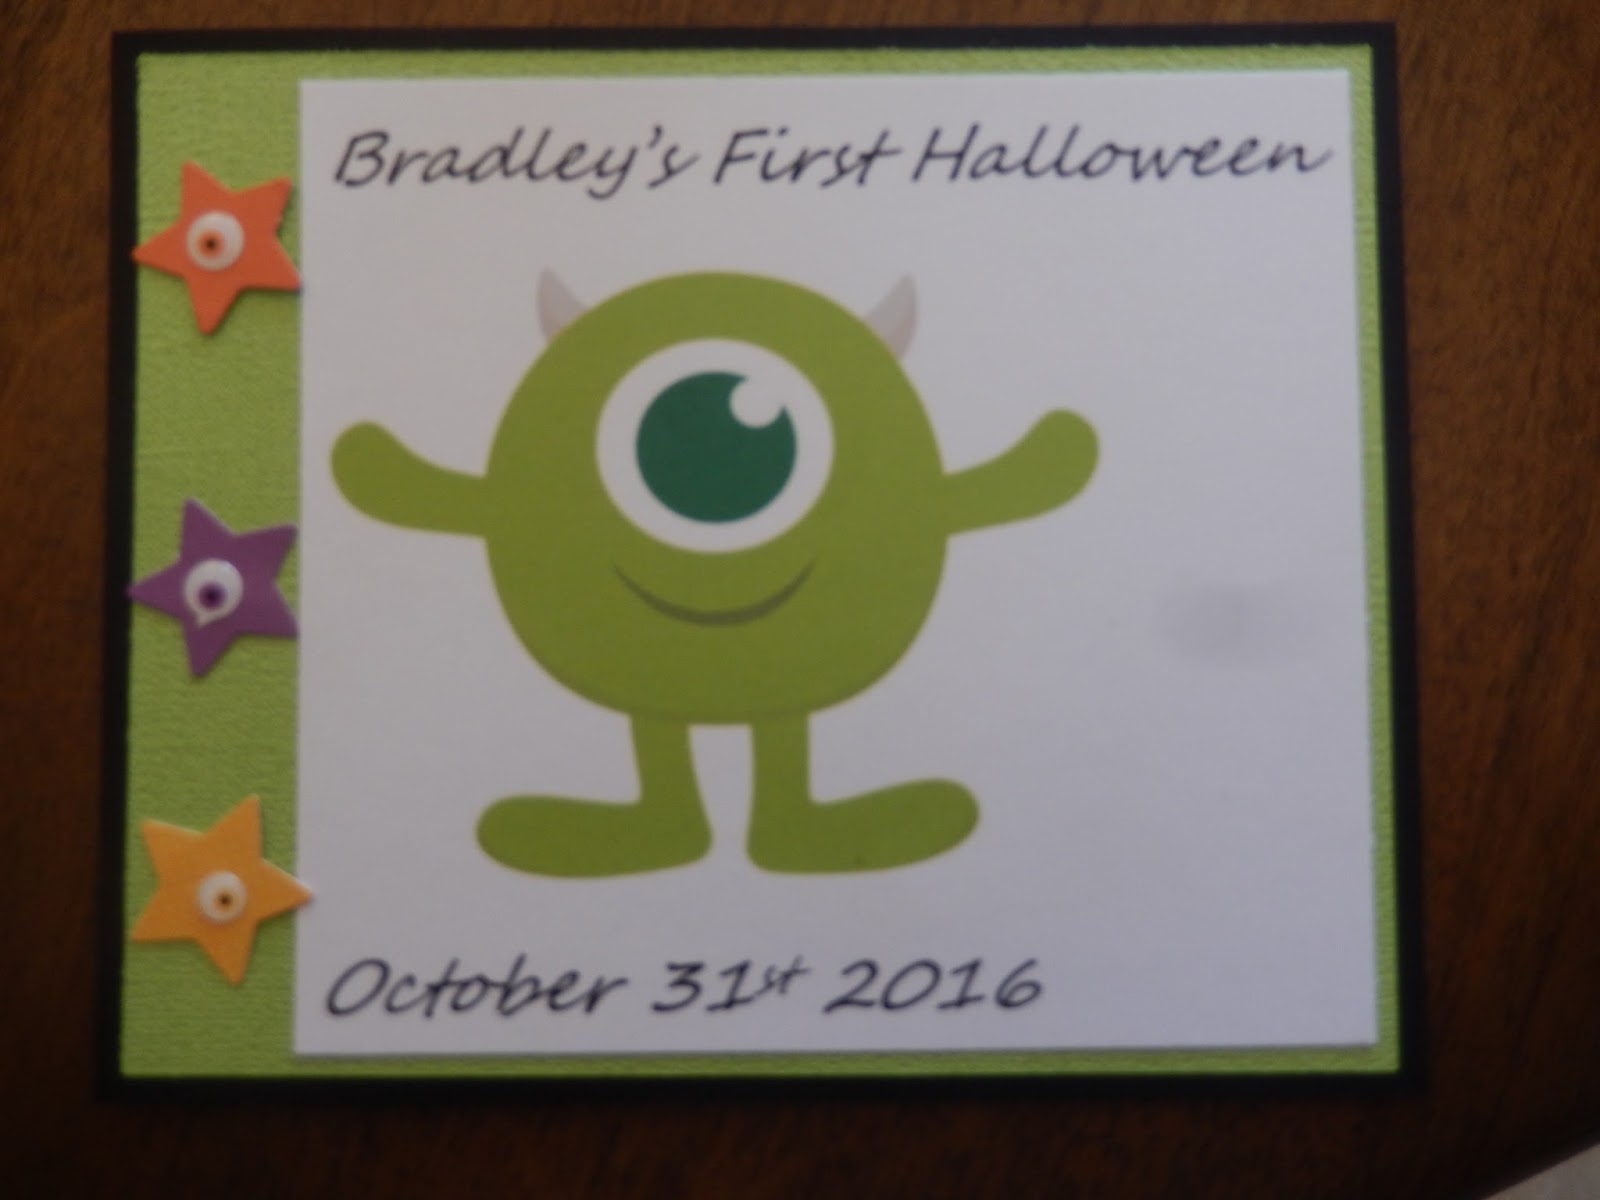
And of course I had to make my grandson a Halloween card to celebrate his first Halloween.
The stars and wiggly eyes are from Doodlebug Boos and Brews.
My daughter in law goes all out! Both the baby and the dog (Roxy is a teacup terrier) will be dressed up this Halloween. Bradley will be a character from Monsters, Inc. which is pictured on the front of the card and Roxy is a Minion! Pictures to follow after Halloween!
I will close today by sharing Bradley's 2 month old picture.
Thank you for visiting and have a great week ahead!
N~
Sunday, October 16, 2016
Spooky Fun
Happy Sunday! I was off this past week from work and spent lots of time between my craft room and visiting my grandson! Today he is 2 months old. I'm waiting for my daughter-in-law to send me the 'official' picture for his baby album.
But in the meantime, I was all over Pinterest getting ideas for Halloween cards. I've been doing all mini photo albums lately that I lost my mojo for card-making! Since I just received a new Stampin Up order with some of their new Halloween thinlits and coordinating stamp sets, I searched for ideas.
I used the same stamp and die set on this card too. CS is also from Stampin Up. The pattern paper used to make the tag is from my stash so it could be years old! I save all my scraps! The sentiment was stamped and heat embossed with black embossing powder.
Lastly, I used green, purple, orange and white cardstock, punched out circles, stamped the pumpkins and used a blender pen and orange ink to color them in. The background was stamped with purple ink using Stampin Up's Gorgeous Grunge stamp set.
Thanks for stopping by! Enjoy your week ahead and GO CUBS!
N~
But in the meantime, I was all over Pinterest getting ideas for Halloween cards. I've been doing all mini photo albums lately that I lost my mojo for card-making! Since I just received a new Stampin Up order with some of their new Halloween thinlits and coordinating stamp sets, I searched for ideas.
This card uses designer series papers from last year's Stampin Up's Halloween release along with this years new stamp set called Spooky Fun and Halloween Scenes Edgelits dies. The sentiment was stamped and heat embossed with white embossing powder. I also stamped a few bats on top of tag.
Lastly, I used green, purple, orange and white cardstock, punched out circles, stamped the pumpkins and used a blender pen and orange ink to color them in. The background was stamped with purple ink using Stampin Up's Gorgeous Grunge stamp set.
Thanks for stopping by! Enjoy your week ahead and GO CUBS!
N~
Subscribe to:
Posts (Atom)